方案背景
搭建Redis Cluster集群,然后从单机Redis迁移至Redis集群该方案在单机环境下分别使用6381、6382、6383、6384、6385、6386端口创建redis实例,即伪集群;部署分布式生产环境,放行IP互通即可;
搭建Redis Cluster集群大致思路
172.19.19.26 6381    //逻辑Redis主机实例
172.19.19.26 6382    //逻辑Redis主机实例
172.19.19.26 6383    //逻辑Redis主机实例
172.19.19.26 6384    //逻辑Redis主机实例
172.19.19.26 6385    //逻辑Redis主机实例
172.19.19.26 6386 //逻辑Redis主机实例[root@redis ] vim /etc/hosts
172.19.19.26 redis1
172.19.19.26 redis2
172.19.19.26 redis3
......[root@redis ~]# yun install redis -y相关路径声明
/usr/local/redis-6.2.1 //Redis部署路径
/opt/ //Redis包存放路径[root@redis ~]# cd /opt/
[root@redis ~]# wget https://download.redis.io/releases/redis-6.2.1.tar.gz
[root@redis ~]# ll
total 231992
-rw-r--r-- 1 root root 2438367 Mar 2 14:35 redis-6.2.1.tar.gz
[root@yihubaijia-redis redis]# tar -xvf redis-6.2.1.tar.gz -C /usr/local/
[root@yihubaijia-redis redis]# cd /usr/local/redis-6.2.1
[root@yihubaijia-redis redis]# make && make install[root@redis ~]# mkdir -p /usr/local/redis_cluster/redis_63{81,82,83,84,85,86}/{pid,logs}备注:Redis默认有两种启动文件,一种是集群模式下启动文件、另一种是普通模式单机启动文件,这里我们介绍集群模式下的、分别编辑六份redis.conf启动配置文件;
[root@redis ~]# vim /usr/local/redis_cluster/redis_6381/redis.conf     //六份redis.conf依次替换端口信息

save 300 10
save 60 10000
stop-writes-on-bgsave-error yes
rdbcompression yes
rdbchecksum yes
dbfilename dump_6381.rdb
replica-serve-stale-data yes
replica-read-only yes
repl-diskless-sync no
repl-diskless-sync-delay 5
repl-disable-tcp-nodelay no
replica-priority 100
lazyfree-lazy-eviction no
lazyfree-lazy-expire no
lazyfree-lazy-server-del no
replica-lazy-flush no
appendfilename "appendonly.aof"
appendfsync everysec
no-appendfsync-on-rewrite no
auto-aof-rewrite-percentage 100
auto-aof-rewrite-min-size 64mb
aof-load-truncated yes
aof-use-rdb-preamble yes
lua-time-limit 5000
slowlog-log-slower-than 10000
slowlog-max-len 128
latency-monitor-threshold 0
notify-keyspace-events ""
hash-max-ziplist-entries 512
hash-max-ziplist-value 64
list-max-ziplist-size -2
list-compress-depth 0
set-max-intset-entries 512
zset-max-ziplist-entries 128
zset-max-ziplist-value 64
hll-sparse-max-bytes 3000
stream-node-max-bytes 4096
stream-node-max-entries 100
activerehashing yes
client-output-buffer-limit normal 0 0 0
client-output-buffer-limit replica 256mb 64mb 60
client-output-buffer-limit pubsub 32mb 8mb 60
hz 10
dynamic-hz yes
aof-rewrite-incremental-fsync yes
rdb-save-incremental-fsync ye[root@redis ~]###### cluster-end ###################################
# vim 编辑框下,快速修改
:%s/6381/6382/g在启动集群时,会按照Redis服务配置文件的配置项判断是否启动集群模式,如图所示;
每个节点上执行以下命令进行Redis服务启动;
[root@redis ~]# redis-server /usr/local/redis_cluster/redis_6381/redis.conf
[root@redis ~]# redis-server /usr/local/redis_cluster/redis_6382/redis.conf
[root@redis ~]# redis-server /usr/local/redis_cluster/redis_6383/redis.conf
[root@redis ~]# redis-server /usr/local/redis_cluster/redis_6384/redis.conf
[root@redis ~]# redis-server /usr/local/redis_cluster/redis_6385/redis.conf
[root@redis ~]# redis-server /usr/local/redis_cluster/redis_6386/redis.conf
Redis集群模式启动,它的进行后会加上[cluster]的字样;
[root@redis ~]# ps -ef | grep redis
root     12758 26596  0 10:19 pts/0    00:00:00 grep --color=auto redis
root     23470     1  0 Apr23 ?        00:19:16 redis-server 172.19.19.26:6381 [cluster]
root     23498     1  0 Apr23 ?        00:19:44 redis-server 172.19.19.26:6382 [cluster]
root     23528     1  0 Apr23 ?        00:19:36 redis-server 172.19.19.26:6383 [cluster]
root     23556     1  0 Apr23 ?        00:20:02 redis-server 172.19.19.26:6384 [cluster]
root     23580     1  0 Apr23 ?        00:20:50 redis-server 172.19.19.26:6385 [cluster]
root     23608     1  0 Apr23 ?        00:18:51 redis-server 172.19.19.26:6386 [cluster]
然后,查看一下Redis cluster集群节点配置文件,会发现生成了一组集群信息,六个Redis服务都是不同的;
[root@redis ~]# cat /usr/local/redis_cluster/redis_6381/nodes_6381.conf
83690fdef880abf00e7d1db9533172160ff89735 :0@0 myself,master - 0 0 0 connected
vars currentEpoch 0 lastVoteEpoch 0

[root@redis ~]# cat /usr/local/redis_cluster/redis_6382/nodes_6382.conf
00d2c7b5507e41f5d7f67cbcb1f23b93270ca3f3 :0@0 myself,slave - 0 0 0 connected
vars currentEpoch 0 lastVoteEpoch 0

# 第一段信息是这个Redis服务作为集群节点的一个身份编码
# 别名为集群的node-id截止现在,我们可以说六个Redis Cluster实例已成功启动,但彼此间并无集群关联性,并无集群所具备的功能性,下一步要做的就是将Redis Cluster实例配置到一个集群中;
[root@redis ~]# redis-cli -h 172.19.19.26 -a mima -p 6381

172.19.19.26:6381> cluster meet 172.19.19.26 6382
172.19.19.26:6381> cluster meet 172.19.19.26 6383
172.19.19.26:6381> cluster meet 172.19.19.26 6384
172.19.19.26:6381> cluster meet 172.19.19.26 6385
172.19.19.26:6381> cluster meet 172.19.19.26 6386
查看当前集群所有的节点信息;
172.19.19.26:6381> cluster nodes

8a28df113bfdd803b061d6cc3766bb1182afdb38 172.19.19.26:6383@16383 master - 0 1619487429559 4 connected
7ffb20b51ce9606dcbf04a3443f96b84734394cf 172.19.19.26:6384@16384 slave 8a28df113bfdd803b061d6cc3766bb1182afdb38 0 1619487427000 4 connected
83690fdef880abf00e7d1db9533172160ff89735 172.19.19.26:6381@16381 myself,master - 0 1619487429000 2 connected
00d2c7b5507e41f5d7f67cbcb1f23b93270ca3f3 172.19.19.26:6382@16382 slave 83690fdef880abf00e7d1db9533172160ff89735 0 1619487428000 2 connected
a66ce835a0fff1c164bc517dc87917d42890ea87 172.19.19.26:6386@16386 slave f58c45f4b9824a63d100e967bbabdff3d6e9cd64 0 1619487428000 0 connected
f58c45f4b9824a63d100e967bbabdff3d6e9cd64 172.19.19.26:6385@16385 master - 0 1619487428558 0 connected
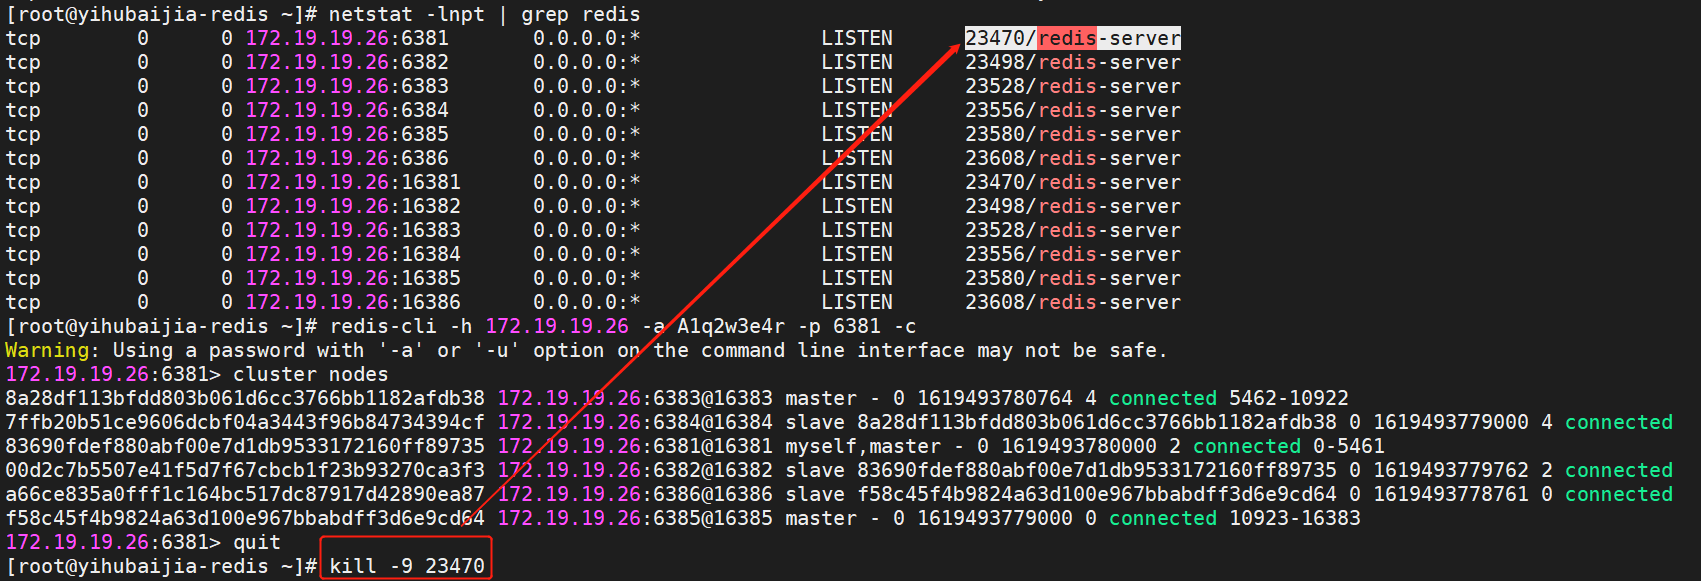
查看端口监听,出现Gossip监听的1000+端口,此时代表集群各个节点之间已经能互相通信了;

| HOSTNAME | 节点 | Noed-ID |
| redis | 172.19.19.26:6381 | 83690fdef880abf00e7d1db9533172160ff89735 |
| redis | 172.19.19.26:6383 | 8a28df113bfdd803b061d6cc3766bb1182afdb38 |
| redis | 172.19.19.26:6385 | f58c45f4b9824a63d100e967bbabdff3d6e9cd64 |
首先是172.19.19.26的6382,将它映射到172.19.19.26的6381;
[root@redis ~]# redis-cli -h 172.19.19.26 -a mima -p 6382
172.19.19.26:6382> cluster replicate 83690fdef880abf00e7d1db9533172160ff89735
然后是172.19.19.26的6384,将它映射到172.19.19.26的6383;
[root@redis ~]# redis-cli -h 172.19.19.26 -a mima -p 6384
172.19.19.26:6384> cluster replicate 8a28df113bfdd803b061d6cc3766bb1182afdb38
最后是172.19.19.26的6386,将它映射到172.19.19.26的6385;
[root@redis ~]# redis-cli -h 172.19.19.26 -a mima -p 6386
172.19.19.26:6386> cluster replicate f58c45f4b9824a63d100e967bbabdff3d6e9cd64
查看集群节点信息;
[root@redis ~]# redis-cli -h 172.19.19.26 -a mima -p 6381

172.19.19.26:6381> cluster nodes
8a28df113bfdd803b061d6cc3766bb1182afdb38 172.19.19.26:6383@16383 master - 0 1619487429559 4 connected
7ffb20b51ce9606dcbf04a3443f96b84734394cf 172.19.19.26:6384@16384 slave 8a28df113bfdd803b061d6cc3766bb1182afdb38 0 1619487427000 4 connected
83690fdef880abf00e7d1db9533172160ff89735 172.19.19.26:6381@16381 myself,master - 0 1619487429000 2 connected
00d2c7b5507e41f5d7f67cbcb1f23b93270ca3f3 172.19.19.26:6382@16382 slave 83690fdef880abf00e7d1db9533172160ff89735 0 1619487428000 2 connected
a66ce835a0fff1c164bc517dc87917d42890ea87 172.19.19.26:6386@16386 slave f58c45f4b9824a63d100e967bbabdff3d6e9cd64 0 1619487428000 0 connected
f58c45f4b9824a63d100e967bbabdff3d6e9cd64 172.19.19.26:6385@16385 master - 0 1619487428558 0 connecteRedis Cluster集群槽位分配通用原则是平均分配至各主节点,从节点仅做备份和读库使用;
槽位分配情况如下,槽位号从0开始,到16383结束,共16384个槽位;
| 节点 | 槽位数量 |
| 172.19.19.26:6381 | 0 - 5461 |
| 172.19.19.26:6383 | 5461 - 10922 |
| 172.19.19.26:6385 | 10922 - 16383 |
执行如下命令分配槽位;
[root@redis ~]# redis-cli -h 172.19.19.26 -a mima -p 6381 cluster addslots {0..5461}
[root@redis ~]# redis-cli -h 172.19.19.26 -a mima -p 6383 cluster addslots {5462..10922}
[root@redis ~]# redis-cli -h 172.19.19.26 -a mima -p 6385 cluster addslots {10923..16383}
校验集群下槽位分配信息是否与规划一致;
[root@redis ~]# redis-cli -h 172.19.19.26 -a mima -p 6381
172.19.19.26:6381> CLUSTER nodes
8a28df113bfdd803b061d6cc3766bb1182afdb38 172.19.19.26:6383@16383 master - 0 1619491542201 4 connected 5462-10922
7ffb20b51ce9606dcbf04a3443f96b84734394cf 172.19.19.26:6384@16384 slave 8a28df113bfdd803b061d6cc3766bb1182afdb38 0 1619491540197 4 connected
83690fdef880abf00e7d1db9533172160ff89735 172.19.19.26:6381@16381 myself,master - 0 1619491538000 2 connected 0-5461
00d2c7b5507e41f5d7f67cbcb1f23b93270ca3f3 172.19.19.26:6382@16382 slave 83690fdef880abf00e7d1db9533172160ff89735 0 1619491541199 2 connected
a66ce835a0fff1c164bc517dc87917d42890ea87 172.19.19.26:6386@16386 slave f58c45f4b9824a63d100e967bbabdff3d6e9cd64 0 1619491539195 0 connected
f58c45f4b9824a63d100e967bbabdff3d6e9cd64 172.19.19.26:6385@16385 master - 0 1619491540000 0 connected 10923-16383
# 看master节点的最后字段[root@redis ~]# redis-cli -h 172.19.19.26 -a mima -p 6381
172.19.19.26:6381> CLUSTER info
cluster_state:ok
cluster_slots_assigned:16384
cluster_slots_ok:16384
cluster_slots_pfail:0
cluster_slots_fail:0
cluster_known_nodes:6
cluster_size:3
cluster_current_epoch:5
cluster_my_epoch:2
cluster_stats_messages_ping_sent:341643
cluster_stats_messages_pong_sent:337613
cluster_stats_messages_meet_sent:6
cluster_stats_messages_sent:679262
cluster_stats_messages_ping_received:337612
cluster_stats_messages_pong_received:341649
cluster_stats_messages_meet_received:1
cluster_stats_messages_received:679262172.19.19.26:的master节点上进行写操作;
[root@redis ~]# redis-cli -h 172.19.19.26 -a mima -p 6381
172.19.19.26:6381> set a 10691.cn
(error) MOVED 15495 172.19.19.26:6385      //它会提示你去172.19.19.26:6385上进行写入,这个就是MOVED重定向。
Redis Cluster集群下“-c”参数使用场景;
为了解决MOVED重定向问题,引入“-c”参数,-c参数无所谓你的Redis是否是集群模式,任何登录操作都加上,这样即使是Redis集群也会自动进行MOVED重定向;
[root@redis ~]# redis-cli -c -h 172.19.19.26 -a mima -p 6381

172.19.19.26:6381> set a 10691.cn
-> Redirected to slot [15495] located at 172.19.19.26:6385
OK上面截图所示,数据被写入到172.19.19.26:6385主节点上,我们登录6385的从节点get下是否存在;
[root@redis ~]# redis-cli -h 172.19.19.26 -a mima -p 6386 -c

172.19.19.26:6386> get a
-> Redirected to slot [15495] located at 172.19.19.26:6385
"10691.cn"例如172.19.19.26:6381故障停止运行,此时应该由172.19.19.26:6382来接替Master工作;

登录集群任意节点查看目前的集群节点信息;

[root@redis ~]# redis-server /usr/local/redis_cluster/redis_6381/redis.conf
登录任意节点,发现172.19.19.26:6381已经自动的进行上线了,并且作为172.19.19.26:6382的从库;
CLUSTER INFO 打印集群的信息
CLUSTER NODES 列出集群当前已知的所有节点(node),以及这些节点的相关信息。
CLUSTER MEET <ip> <port> 将ip和port所指定的节点添加到集群当中,让它成为集群的一份子
CLUSTER FORGET <node_id> 登陆集群任意节点,移除节点
CLUSTER REPLICATE <node_id> 将当前节点设置为 node_id 指定的节点的从节点
CLUSTER SAVECONFIG 将节点的配置文件保存到硬盘里面

CLUSTER SETSLOT <slot> MIGRATING <node_id> 将本节点的槽 slot 迁移到 node_id 指定的节点中
CLUSTER SETSLOT <slot> IMPORTING <node_id> 从 node_id 指定的节点中导入槽 slot 到本节点
CLUSTER SETSLOT <slot> STABLE 取消对槽 slot 的导入(import)或者迁移(migrate)

CLUSTER KEYSLOT <key> 计算键 key 应该被放置在哪个槽上
CLUSTER COUNTKEYSINSLOT <slot> 返回槽 slot 目前包含的键值对数量
CLUSTER GETKEYSINSLOT <slot> <count> 返回 count 个 slot 槽中的键

CLUSTER ADDSLOTS <slot> [slot ...] 将一个或多个槽(slot)指派(assign)给当前节点
CLUSTER DELSLOTS <slot> [slot ...] 移除一个或多个槽对当前节点的指派
CLUSTER FLUSHSLOTS 移除指派给当前节点的所有槽,让当前节点变成一个没有指派任何槽的节点
CLUSTER SETSLOT <slot> NODE <node_id> 将槽 slot 指派给 node_id 指定的节点,如果槽已经指派给另一个节点,那么先让另一个节点删除该槽>,然后再进行指派
CLUSTER SETSLOT <slot> MIGRATING <node_id> 将本节点的槽 slot 迁移到 node_id 指定的节点中
CLUSTER SETSLOT <slot> IMPORTING <node_id> 从 node_id 指定的节点中导入槽 slot 到本节点
CLUSTER SETSLOT <slot> STABLE 取消对槽 slot 的导入(import)或者迁移(migrate)[root@test ~]# redis-cli -h 172.17.3.124 -a mima
172.17.3.124:6379> bgsave
Background saving started
172.17.3.124:6379> config get dir
1) "/www/server/redis"
172.17.3.124:6379> quit
[root@test ~]# systemctl stop redis.service
[root@test ~]# ll
前面我们为了完整介绍集群环境搭建,已经为其redis cluster集群环境分配了槽位,在新旧环境迁移备份还原时,还原规则所致,我们这里需要合并槽位,形成单机--单机来还原数据,然后再从新分配槽位的总体思路;
合并槽位如下命令;
redis-cli --cluster reshard <host>:<port> <passwd> --cluster-from <node-id> --cluster-to <node-id> --cluster-slots <number of slots> --cluster-yes
参数解释:
<host>:<port> :redis任意一个可以访问的节点
<passwd>:如果有密码,则加“-a 密码”,否则报错[ERR] Node 172.19.19.26:6381 NOAUTH Authentication required.
<node-id>: 节点的节点Id(RunId),这里指的是被合并清零的节点
<number of slots>:迁移的卡槽数量
[root@redis ~]# redis-cli --cluster reshard 172.19.19.26:6381 -a mima --cluster-from 8a28df113bfdd803b061d6cc3766bb1182afdb38 --cluster-to 83690fdef880abf00e7d1db9533172160ff89735 --cluster-slots 5461 --cluster-yes
Warning: Using a password with '-a' or '-u' option on the command line interface may not be safe.
>>> Performing Cluster Check (using node 172.19.19.26:6381)
M: 83690fdef880abf00e7d1db9533172160ff89735 172.19.19.26:6381
slots:[0-5461] (5462 slots) master
1 additional replica(s)
S: a66ce835a0fff1c164bc517dc87917d42890ea87 172.19.19.26:6386
slots: (0 slots) slave
replicates f58c45f4b9824a63d100e967bbabdff3d6e9cd64
M: f58c45f4b9824a63d100e967bbabdff3d6e9cd64 172.19.19.26:6385
slots:[10923-16383] (5461 slots) master
1 additional replica(s)
S: 7ffb20b51ce9606dcbf04a3443f96b84734394cf 172.19.19.26:6384
slots: (0 slots) slave
replicates 8a28df113bfdd803b061d6cc3766bb1182afdb38
M: 8a28df113bfdd803b061d6cc3766bb1182afdb38 172.19.19.26:6383
slots:[5462-10922] (5461 slots) master
1 additional replica(s)
S: 00d2c7b5507e41f5d7f67cbcb1f23b93270ca3f3 172.19.19.26:6382
slots: (0 slots) slave
replicates 83690fdef880abf00e7d1db9533172160ff89735
[OK] All nodes agree about slots configuration.
>>> Check for open slots...
>>> Check slots coverage...
[OK] All 16384 slots covered.
Ready to move 5461 slots.
Source nodes:
M: 83690fdef880abf00e7d1db9533172160ff89735 172.19.19.26:6381
slots:[0-5461] (5462 slots) master
1 additional replica(s)
Destination node:
M: 8a28df113bfdd803b061d6cc3766bb1182afdb38 172.19.19.26:6383
slots:[5462-10922] (5461 slots) master
1 additional replica(s)
Resharding plan:
Moving slot 0 from 83690fdef880abf00e7d1db9533172160ff89735
Moving slot 1 from 83690fdef880abf00e7d1db9533172160ff89735
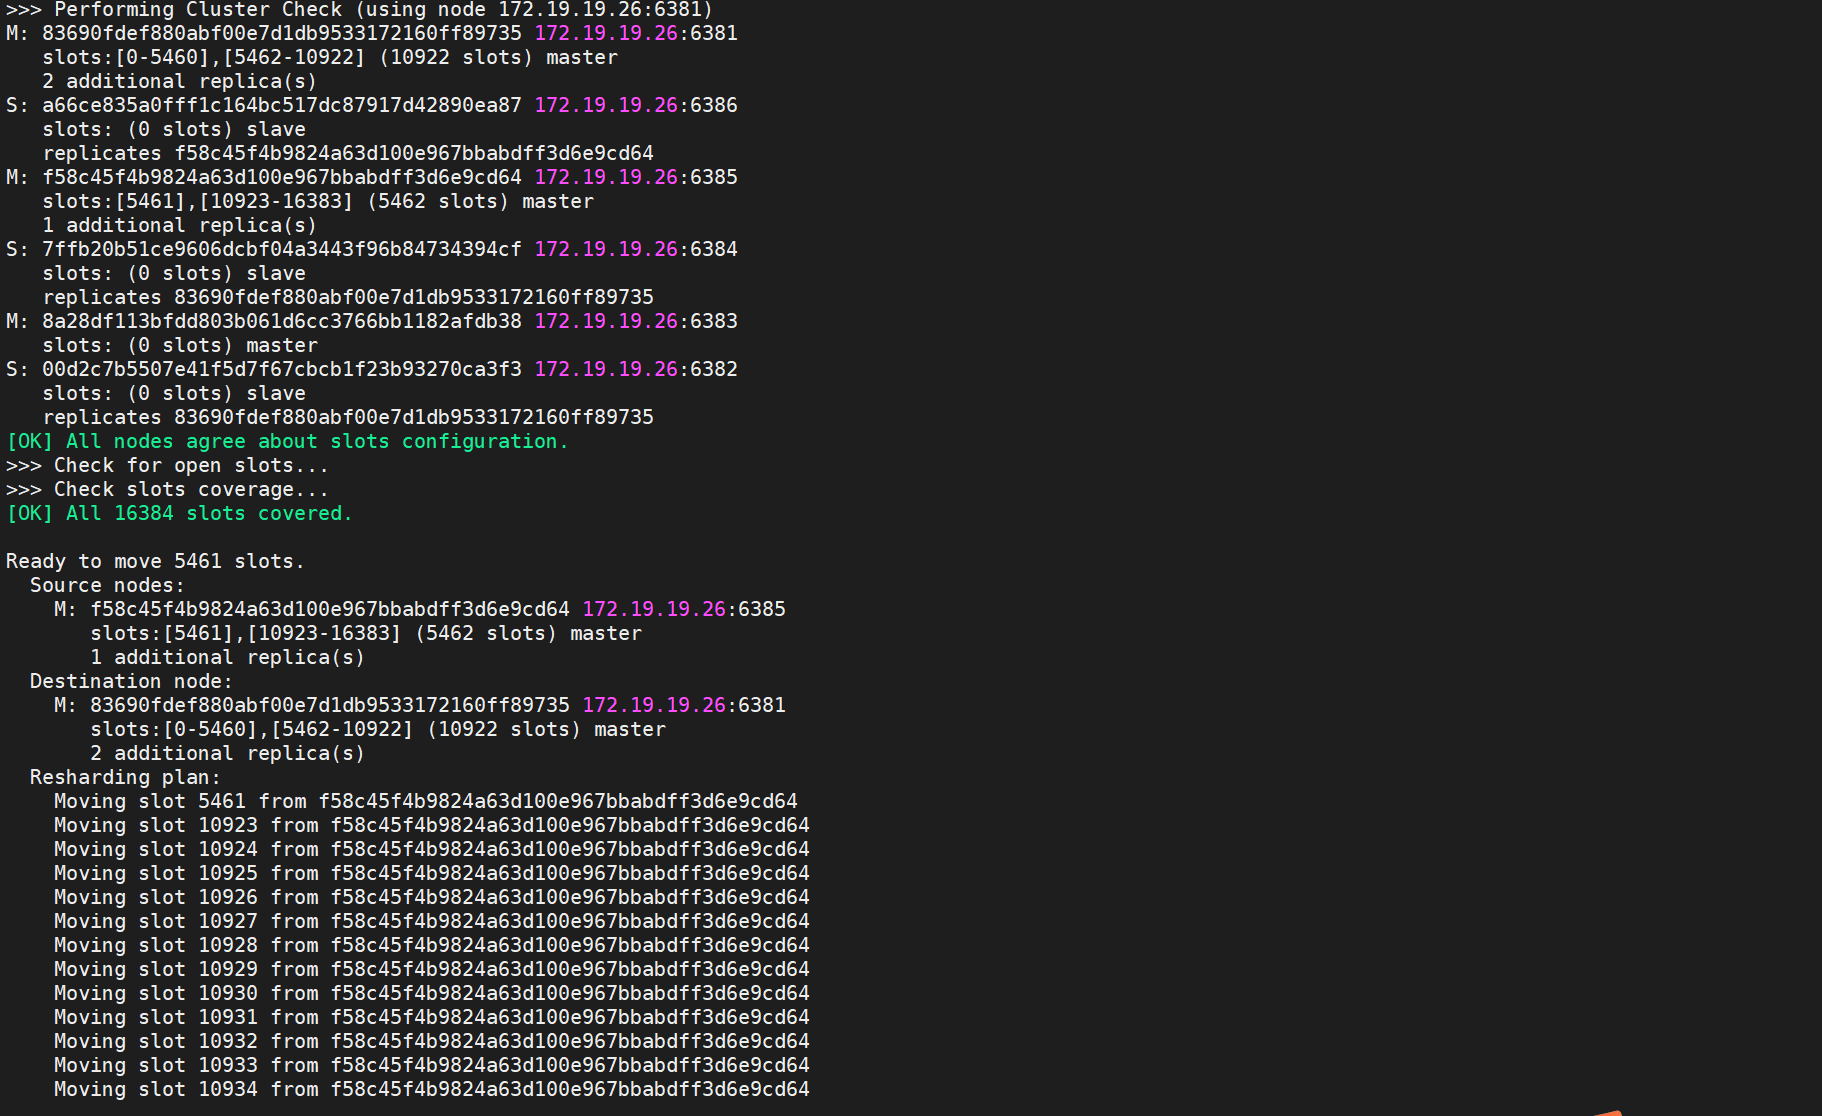
[root@redis ~]# redis-cli --cluster reshard 172.19.19.26:6381 -a mima --cluster-from f58c45f4b9824a63d100e967bbabdff3d6e9cd64 --cluster-to 83690fdef880abf00e7d1db9533172160ff89735 --cluster-slots 5461 --cluster-yes
Warning: Using a password with '-a' or '-u' option on the command line interface may not be safe.
>>> Performing Cluster Check (using node 172.19.19.26:6381)
M: 83690fdef880abf00e7d1db9533172160ff89735 172.19.19.26:6381
slots:[0-5460],[5462-10922] (10922 slots) master
2 additional replica(s)
S: a66ce835a0fff1c164bc517dc87917d42890ea87 172.19.19.26:6386
slots: (0 slots) slave
replicates f58c45f4b9824a63d100e967bbabdff3d6e9cd64
M: f58c45f4b9824a63d100e967bbabdff3d6e9cd64 172.19.19.26:6385
slots:[5461],[10923-16383] (5462 slots) master
1 additional replica(s)
S: 7ffb20b51ce9606dcbf04a3443f96b84734394cf 172.19.19.26:6384
slots: (0 slots) slave
replicates 83690fdef880abf00e7d1db9533172160ff89735
M: 8a28df113bfdd803b061d6cc3766bb1182afdb38 172.19.19.26:6383
slots: (0 slots) master
S: 00d2c7b5507e41f5d7f67cbcb1f23b93270ca3f3 172.19.19.26:6382
slots: (0 slots) slave
replicates 83690fdef880abf00e7d1db9533172160ff89735
[OK] All nodes agree about slots configuration.
>>> Check for open slots...
>>> Check slots coverage...
[OK] All 16384 slots covered.
Ready to move 5461 slots.
Source nodes:
M: f58c45f4b9824a63d100e967bbabdff3d6e9cd64 172.19.19.26:6385
slots:[5461],[10923-16383] (5462 slots) master
1 additional replica(s)
Destination node:
M: 83690fdef880abf00e7d1db9533172160ff89735 172.19.19.26:6381
slots:[0-5460],[5462-10922] (10922 slots) master
2 additional replica(s)
Resharding plan:
Moving slot 5461 from f58c45f4b9824a63d100e967bbabdff3d6e9cd64
Moving slot 10923 from f58c45f4b9824a63d100e967bbabdff3d6e9cd64
Moving slot 10924 from f58c45f4b9824a63d100e967bbabdff3d6e9cd64
[root@yihubaijia-redis ~]# redis-cli -h 172.19.19.26 -a mima -p 6381 -c

172.19.19.26:6381> cluster nodes
a66ce835a0fff1c164bc517dc87917d42890ea87 172.19.19.26:6386@16386 slave 83690fdef880abf00e7d1db9533172160ff89735 0 1619507181000 10 connected
83690fdef880abf00e7d1db9533172160ff89735 172.19.19.26:6381@16381 myself,master - 0 1619507180000 10 connected 0-16383
f58c45f4b9824a63d100e967bbabdff3d6e9cd64 172.19.19.26:6385@16385 master - 0 1619507182000 9 connected
7ffb20b51ce9606dcbf04a3443f96b84734394cf 172.19.19.26:6384@16384 slave 83690fdef880abf00e7d1db9533172160ff89735 0 1619507181802 10 connected
8a28df113bfdd803b061d6cc3766bb1182afdb38 172.19.19.26:6383@16383 master - 0 1619507182804 8 connected
00d2c7b5507e41f5d7f67cbcb1f23b93270ca3f3 172.19.19.26:6382@16382 slave 83690fdef880abf00e7d1db9533172160ff89735 0 1619507180000 10 connected
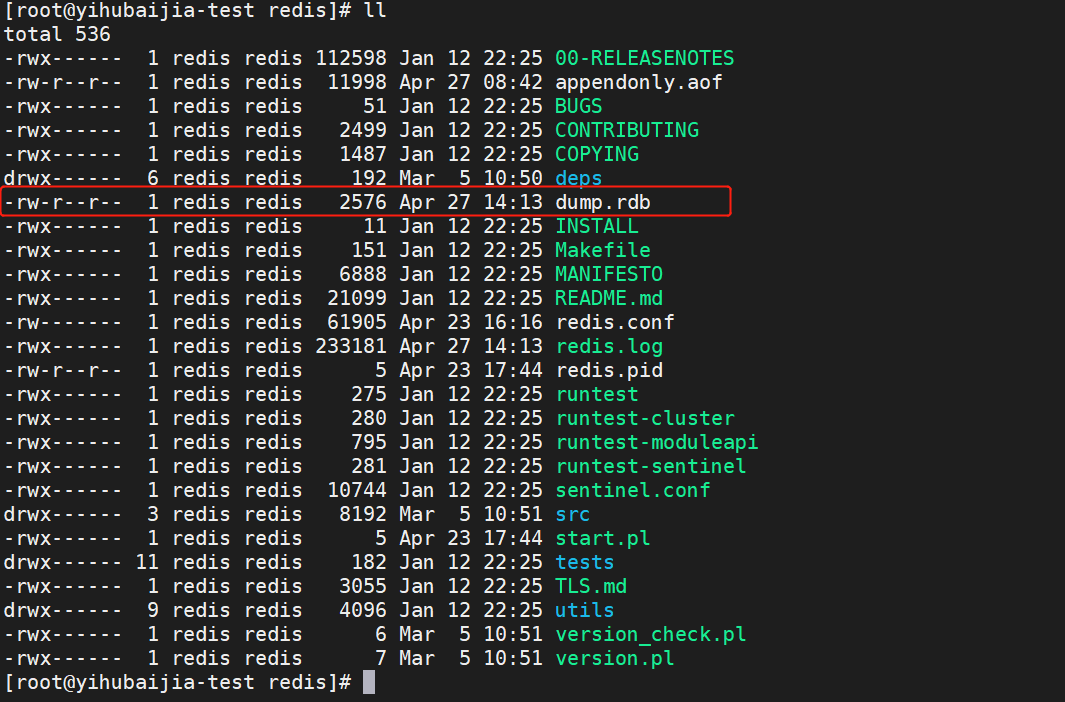
至此,Redis Cluster集群槽位合并在172.19.19.26:6381实例中,下面我们将拷贝/下载原redis中/www/server/redis/dump.rdb 至新Redis Cluster集群数据目录下(/usr/local/redis_cluster/redis_6381/);
启动Redis实例,此步骤只启动172.19.19.26:6381,如图所示,恢复成功;
[root@redis ~]# killall redis-server
[root@redis ~]# redis-server /usr/local/redis_cluster/redis_6381/redis.conf
启动后,验证数据完整性
[root@redis ~]# redis-cli -h 172.19.19.26 -a mima -p 6381

172.19.19.26:6381> keys *
1) "10691.cn"
2) "迁移测试语句"
至此,点对点、单机--单机迁移步骤完成,由于我们最终目的是集群化使用,因此,还需重新分配槽位
执行如下命令分配槽位;
[root@redis ~]# redis-cli -h 172.19.19.26 -a mima -p 6381 cluster addslots {0..5461}
[root@redis ~]# redis-cli -h 172.19.19.26 -a mima -p 6383 cluster addslots {5462..10922}
[root@redis ~]# redis-cli -h 172.19.19.26 -a mima -p 6385 cluster addslots {10923..16383}
[root@redis ~]# redis-cli -h 172.19.19.26 -a mima -p 6381
172.19.19.26:6381> keys *
1) "10691.cn"
2) "迁移测试语句"再次验证,数据完整无误。
提示:如遇链接失效,请在评论区留言反馈