在 Web 服务器中,高可用是指服务器可以正常访问的时间,衡量的标准是在多长时间内可以提供正常服务(99.9%、99.99%、99.999% 等等)。在 Redis 层面,高可用 的含义要宽泛一些,除了保证提供 正常服务(如 主从分离、快速容灾技术 等),还需要考虑 数据容量扩展、数据安全 等等。
在 Redis 中,实现高可用 的技术主要包括 持久化、复制、哨兵和集群,下面简单说明它们的作用,以及解决了什么样的问题:
持久化:持久化是 最简单的 高可用方法。它的主要作用是 数据备份,即将数据存储在 硬盘,保证数据不会因进程退出而丢失。
复制:复制是高可用 Redis 的基础,哨兵 和 集群 都是在 复制基础 上实现高可用的。复制主要实现了数据的多机备份以及对于读操作的负载均衡和简单的故障恢复。缺陷是故障恢复无法自动化、写操作无法负载均衡、存储能力受到单机的限制。
哨兵:在复制的基础上,哨兵实现了 自动化 的 故障恢复。缺陷是 写操作 无法 负载均衡,存储能力 受到 单机 的限制。
集群:通过集群,Redis 解决了 写操作 无法 负载均衡 以及 存储能力 受到 单机限制 的问题,实现了较为 完善 的 高可用方案。
适用于单一云上、中小型架构环境,本指南详细描述Sentinel(哨兵)模式Redis 的高可用性解决方案,高可用、集群、伪集群、下均适用。直白理解:当我们应用服务或体验存在异常的时候,可以自动进行容错或者抵抗异常,从而达到不影响到用户正常使用的一种技术,干货原理,由一个或多个Sentinel 实例 组成的Sentinel 系统可以监视任意多个主服务器,以及这些主服务器属下的所有从服务器,并在被监视的主服务器进入下线状态时,自动将下线主服务器属下的某个从服务器升级为新的主服务器。
每个 Sentinel 节点都需要 定期执行 以下任务:
每个 Sentinel 以 每秒钟 一次的频率,向它所知的 主服务器、从服务器 以及其他 Sentinel 实例 发送一个 PING 命令。
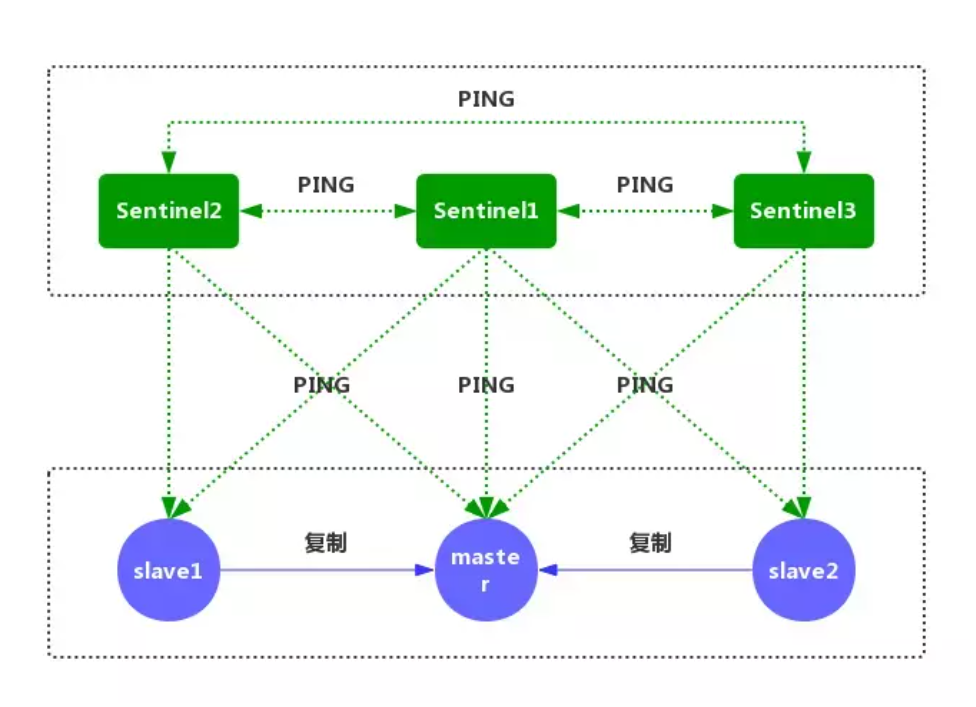
Redis主从复制模式下,一旦 主节点由于故障不能提供服务,需要手动将 从节点晋升为 主节点,同时还要通知 客户端更新主节点地址,这种故障处理方式从一定程度上是无法接受的。Redis 2.8 以后提供了 Redis Sentinel 哨兵机制 来解决这个问题。
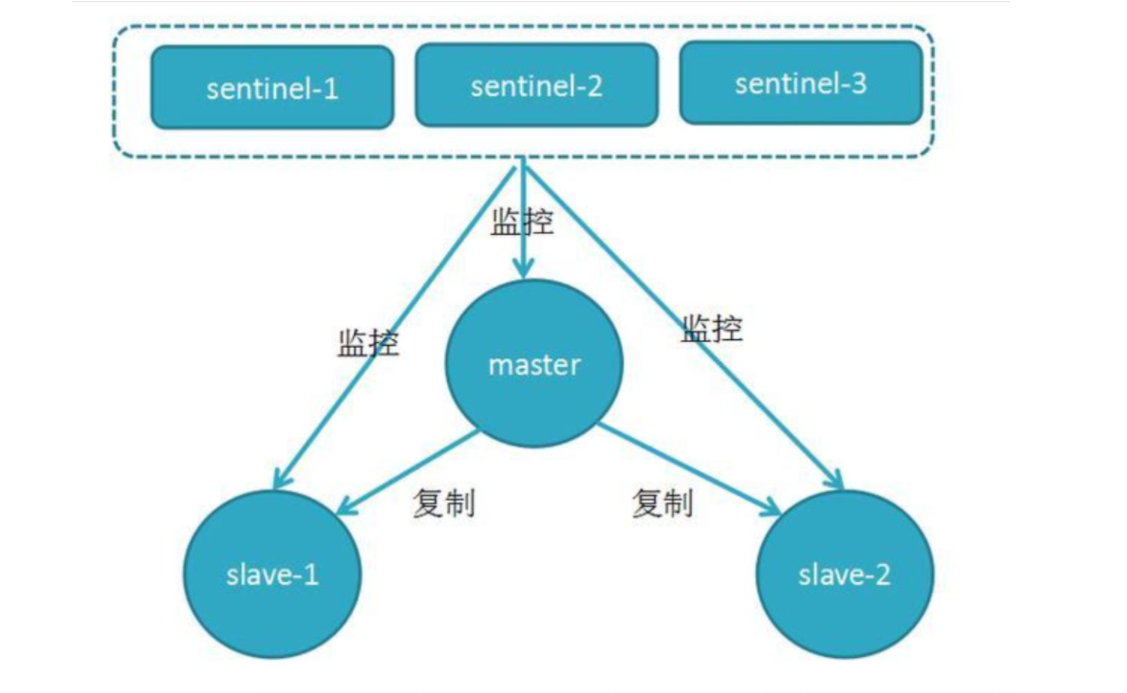
Redis Sentinel 是 Redis 高可用 的实现方案。Sentinel 是一个管理多个 Redis 实例的工具,它可以实现对 Redis 的 监控、通知、自动故障转移。下面先对 Redis Sentinel 的 基本概念 进行简单的介绍。
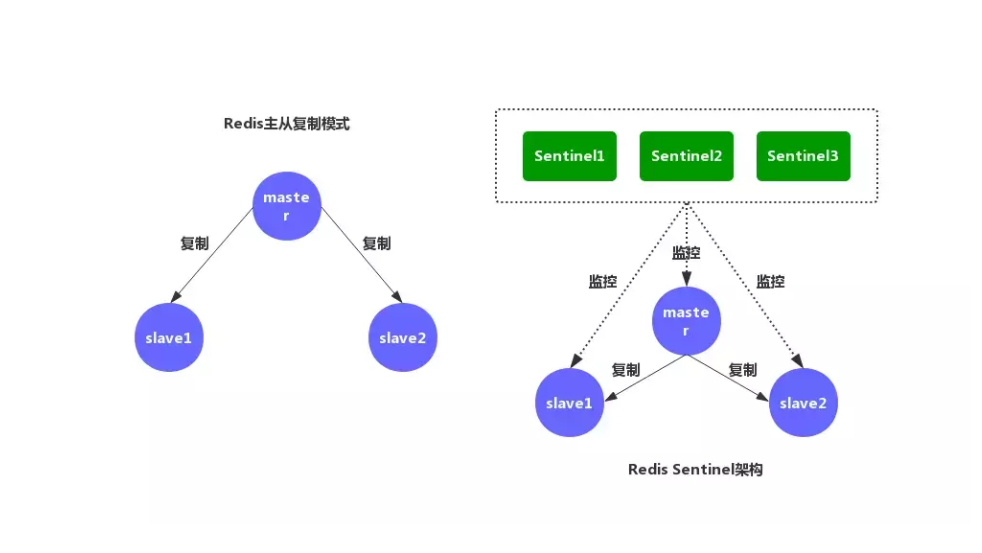
如图所示,Redis 的 主从复制模式 和 Sentinel 高可用架构 的示意图:
系统环境
1、VMware Workstation Pro 16 虚拟机
2、Rocky Linux系统 AlmaLinux-8.3(适用CentOS7、CentOS8)
3、Redis 5.0
4、集群目录规划路径,/usr/local/redis_cluster/redis_638*/
5、YUM部署Redis 5.0实例
##安装Redis Sentinel的epel-release源
[root@redis yum.repos.d]# yum install epel-release
已加载插件:fastestmirror, langpacksLoading mirror speeds from cached hostfile
* base: mirrors.163.com
* extras: mirrors.163.com
* updates: mirrors.ustc.edu.cn
正在解决依赖关系--> 正在检查事务---> 软件包 epel-release.noarch.0.7-11 将被 安装-->
解决依赖关系完成依赖关系解决
=====================================
=====================================
=====================================
======================
Package
架构
版本
源
大小====================
========================
========================
=========================
============================
============正在安装: epel-release noarch   7-11   extras   15 k事务概要
======================================================================================
===============================================
安装  1 软件包总下载量:15 k安装大小:24 kIs this ok [y/d/N]: y
Downloading packages:警告:/var/cache/yum/x86_64/7/extras/packages/epel-release-7-11.noarch.rpm: 头V3 RSA/SHA256 Signature,
密钥 ID f4a80eb5: NOKEYepel-release-7-11.noarch.rpm 的公钥尚未安装epel-release-7-11.noarch.rpm | 15 kB 00:00:00从 file:///etc/pki/rpm-gpg/RPM-GPG-KEY-CentOS-7 检索密钥导入 GPG key 0xF4A80EB5: 用户ID : "CentOS-7 Key (CentOS 7 Official Signing Key) <security@centos.org>" 指纹 : 6341 ab27 53d7 8a78 a7c2 7bb1 24c6 a8a7 f4a8 0eb5 软件包 : centos-release-7-6.1810.2.el7.centos.x86_64 (@anaconda) 来自 : /etc/pki/rpm-gpg/RPM-GPG-KEY-CentOS-7是否继续?[y/N]:yRunning transaction checkRunning transaction testTransaction test succeededRunning transaction 正在安装 : epel-release-7-11.noarch 1/1 验证中 : epel-release-7-11.noarch 1/1已安装: epel-release.noarch 0:7-11完毕![root@redis yum.repos.d]# ll总用量 40-rw-r--r--. 1 root root 1664 11月 23 2018 CentOS-Base.repo-rw-r--r--. 1 root root 1309 11月 23 2018 CentOS-CR.repo-rw-r--r--. 1 root root 649 11月 23 2018 CentOS-Debuginfo.repo-rw-r--r--. 1 root root 314 11月 23 2018 CentOS-fasttrack.repo-rw-r--r--. 1 root root 630 11月 23 2018 CentOS-Media.repo-rw-r--r--. 1 root root 1331 11月 23 2018 CentOS-Sources.repo-rw-r--r--. 1 root root 5701 11月 23 2018 CentOS-Vault.repo-rw-r--r-- 1 root root 951 10月 3 2017 epel.repo-rw-r--r-- 1 root root 1050 10月 3 2017 epel-testing.repo[root@localhost ~]# yum install redis -y# 单机环境下,常用命令
[root@localhost ~]# systemctl start redis.service# 停止redis
[root@localhost ~]# systemctl service stop redis.service# 查看redis运行状态
[root@localhost ~]# systemctl service status redis.service# 查看redis进程
[root@localhost ~]# ps -ef | grep redisRedis Sentinel的部署须知
一个稳健的 Redis Sentinel 集群,应该使用至少 三个 Sentinel 实例,并且保证讲这些实例放到 不同的机器 上,甚至不同的 物理区域。
Sentinel 无法保证 强一致性。
常见的 客户端应用库 都支持 Sentinel。
Sentinel 需要通过不断的 测试 和 观察,才能保证高可用。
[root@localhost ~]# mkdir -p /usr/local/redis_sentinel/redis_63{81,82,83}/{pid,logs}
从初始Redis目录拷贝Redis.conf至各运行目录下,并修改相应配置
##yum安装的Redis初始启动文档在系统根目录/etc/下
[root@localhost ~]# cp /etc/redis.conf /usr/local/redis_sentinel/redis_6381/
[root@localhost ~]# cp /etc/redis.conf /usr/local/redis_sentinel/redis_6382/
[root@localhost ~]# cp /etc/redis.conf /usr/local/redis_sentinel/redis_6383/

##查看文档是否拷贝成功
[root@localhost ~]# ll /usr/local/redis_sentinel/redis_6381/
总用量 64
drwxr-xr-x 2 root root     6 5月  20 16:59 logs
drwxr-xr-x 2 root root     6 5月  20 16:59 pid
-rw-r----- 1 root root 62189 5月  20 17:05 redis.conf
##vim编辑主服master配置如下
[root@localhost ~]# vim /usr/local/redis_sentinel/redis_6381/redis.conf
Redis从服slave配置如下
##vim编辑修改启动相关信息
[root@localhost ~]# vim /usr/local/redis_sentinel/redis_6382/redis.conf
[root@localhost ~]# vim /usr/local/redis_sentinel/redis_6383/redis.conf

sed -i 's/^protected-mode yes$/protected-mode no/g' redis.conf
sed -i 's/^daemonize no$/daemonize yes/g' redis.conf
sed -i 's/^bind 127.0.0.1$/# bind 127.0.0.1/g' redis.conf
sed -i '/^# maxmemory <bytes>$/a\maxmemory 1073741824' redis.confRedis主服master配置如下
##yum安装的Redis初始sentinel哨兵启动文档在系统根目录/etc/下

[root@localhost ~]# cp /etc/redis-sentinel.conf /usr/local/redis_sentinel/redis_6381/
[root@localhost ~]# cp /etc/redis-sentinel.conf /usr/local/redis_sentinel/redis_6382/
[root@localhost ~]# cp /etc/redis-sentinel.conf /usr/local/redis_sentinel/redis_6383/
[root@localhost ~]# ll /usr/local/redis_sentinel/redis_6381/

总用量 76
drwxr-xr-x 2 root root     6 5月  20 16:59 logs
drwxr-xr-x 2 root root     6 5月  20 16:59 pid
-rw-r----- 1 root root 62351 5月  20 17:18 redis.conf
-rw-r----- 1 root root  9746 5月  20 17:43 redis-sentinel.conf
##vim编辑修改启动相关信息,redis_sentinel哨兵模式启动文件三份完全一致,修改对应文件命名端口即可
[root@localhost ~]# vim /usr/local/redis_sentinel/redis_6381/redis-sentinel.conf
[root@localhost ~]# vim /usr/local/redis_sentinel/redis_6382/redis-sentinel.conf
[root@localhost ~]# vim /usr/local/redis_sentinel/redis_6383/redis-sentinel.conf#
##大约在15行
bind 172.19.19.105
##大约在17行
protected-mode no
#大约在21行,根据从机端口修改
port 26381
##大约在26行
daemonize yes
##大约在31行,根据从机修改/redis_638*/命名
pidfile /usr/local/redis_sentinel/redis_6381/redis-sentinel.pid
##大约在36行##大约在36行,根据从机修改/redis_638*/命名
logfile "/usr/local/redis_sentinel/redis_6381/logs/sentinel.log"
##大约在65行,根据从机修改/redis_638*/命名
dir /usr/local/redis_sentinel/redis_6381/
##大约在84行,声明主服redis master配置保持三份一致
sentinel monitor mymaster 172.19.19.105 6381 2
##大约在86行
sentinel auth-pass master 10691.cn
##大约在245行
logfile /usr/local/redis_sentinel/redis_6381/sentinel.log##Redis实例
[root@localhost ~]# redis-server /usr/local/redis_sentinel/redis_6381/redis.conf
[root@localhost ~]# redis-server /usr/local/redis_sentinel/redis_6382/redis.conf
[root@localhost ~]# redis-server /usr/local/redis_sentinel/redis_6383/redis.conf##Redis Sentinel哨兵
[root@localhost ~]# redis-sentinel /usr/local/redis_sentinel/redis_6381/redis-sentinel.conf
[root@localhost ~]# redis-sentinel /usr/local/redis_sentinel/redis_6382/redis-sentinel.conf
[root@localhost ~]# redis-sentinel /usr/local/redis_sentinel/redis_6383/redis-sentinel.conf分别登录Redis主从实例
[root@localhost ~]# redis-cli -h 172.19.19.105 -p 6381 -a 10691.cn

##set写入任意key与值
172.19.19.105:6381> set a aaaaaaaaaaaaaaaaaaaaaaaaaaaaaaaaaaaaaaaaaaaaaa
OK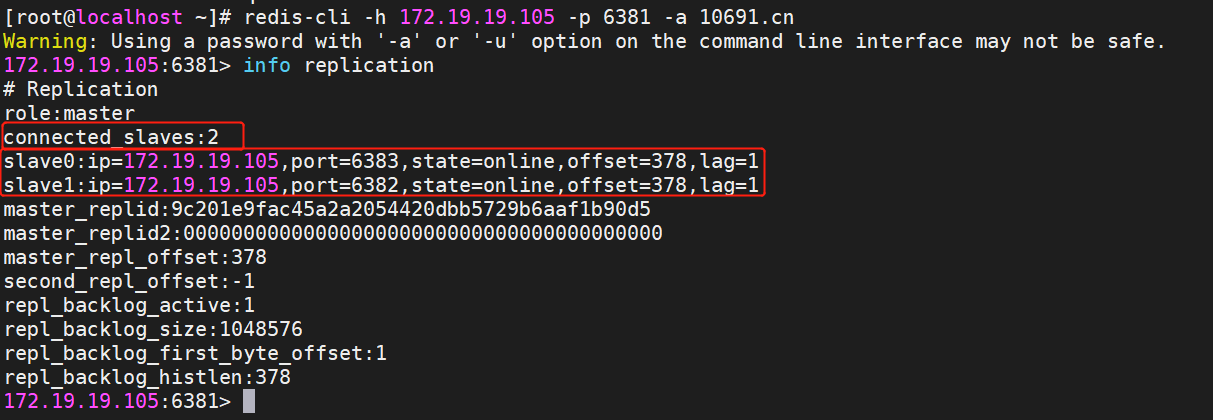
[root@localhost ~]# redis-cli -h 172.19.19.105 -p 6382 -a 10691.cn

##Redis从机6382已同步过来Redis主机的key
172.19.19.105:6382> keys *
1) "a"
172.19.19.105:6382> get a
"aaaaaaaaaaaaaaaaaaaaaaaaaaaaaaaaaaaaaaaaaaaaaa"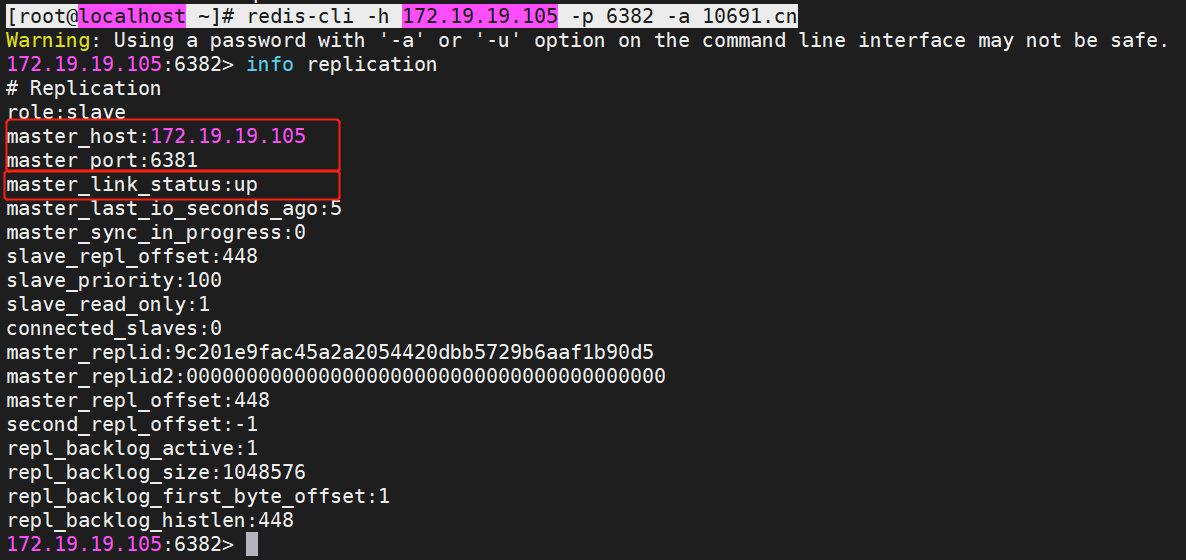
登录哨兵,查看status状态OK、slaves从机为2、sentinels哨兵为3,表示Redis_Sentinel哨兵机制部署成功
[root@localhost ~]# redis-cli -h 172.19.19.105 -p 26381 -a 10691.cn

172.19.19.105:26381> info sentinel
# Sentinel
sentinel_masters:1
sentinel_tilt:0
sentinel_running_scripts:0
sentinel_scripts_queue_length:0
sentinel_simulate_failure_flags:0
master0:name=mymaster,status=ok,address=127.0.0.1:6381,slaves=2,sentinels=3

172.19.19.105:26382> info sentinel
# Sentinel
sentinel_masters:1
sentinel_tilt:0
sentinel_running_scripts:0
sentinel_scripts_queue_length:0
sentinel_simulate_failure_flags:0
master0:name=mymaster,status=ok,address=127.0.0.1:6381,slaves=2,sentinels=3

172.19.19.105:26383> info sentinel
# Sentinel
sentinel_masters:1
sentinel_tilt:0
sentinel_running_scripts:0
sentinel_scripts_queue_length:0
sentinel_simulate_failure_flags:0
master0:name=mymaster,status=ok,address=127.0.0.1:6381,slaves=2,sentinels=3提示:如遇链接失效,请在评论区留言反馈